We love to use a jigsaw as it can make all the cuts we need day-to-day. We always keep one ready to use at the side of the shop, with our favorite jigsaw blade ready to go. When you are just starting out with a jigsaw it is a good idea to get to know exactly how to use it. Here are 5 of the best jigsaw projects for beginners you can have a go at.
We believe the best way to learn is through doing. Don’t worry if you make a mistake, it’s all about learning and correcting!
1. A Jigsaw Heart
We start with a simple but intricate heart for the main person in your life. Everyone loves to receive something handmade, so show them that they matter to you as well.
Print out the heart outline onto standard paper. Next, use contact adhesive to attach it onto a good piece of hardwood.
With your jigsaw cut along the black lines starting by going around the heart and then cutting through the middle. Finally, remove the paper guide and sand the edges to leave a nice finish. For an extra touch apply varnish which will make it shine!

2. Cheese Board
A classic beginner’s jigsaw project is a cheese board, simple but effective. Hard olive wood is great for this project as the wood looks great and the natural oils in the wood provide natural protection.

Once you have picked your timber of choice, grab a large A3 sheet of paper, and draw out your intended design. A great tip is to grab a few pieces of cheese from the fridge to work out how much space you might need. Also, don’t forget to include a handle if you want one.
As with the heart cut out your template and secure it onto the timber with contact adhesive. Using a fine-tooth blade on your jigsaw carefully cut around your design. Remove the template and sand down the edges so that they are nicely rounded and smooth.
3. Desk Organizer
Nobody likes an untidy workshop and the same can be said for our desk. With a few spare plank offcuts and a drill, you can make a great little desk organizer with your jigsaw.
Cut three pieces to the same width and length and use wood glue and clamps to secure two of them together. Using your jigsaw cut out the sections for your phone, notepad, calculator, etc. from the two joined pieces. It’s a good idea to plan where you will place everything before cutting. Next, use a drill to make holes large enough for your pens and pencils to sit in.
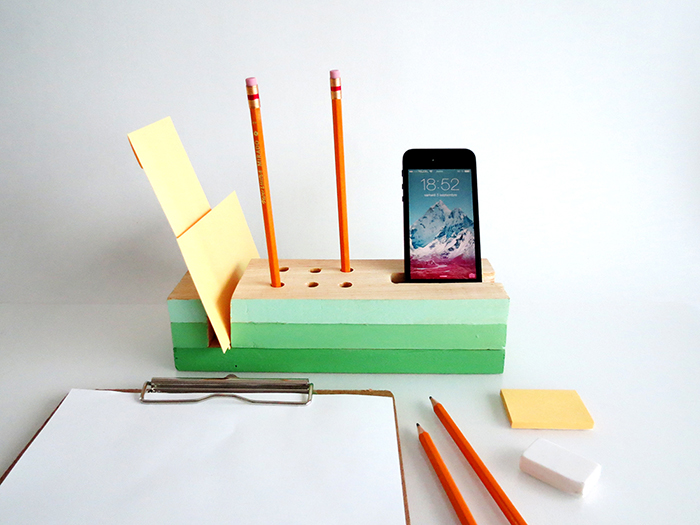
Once all the cuts have been made use wood glue and clamps again to secure the pieces onto the remaining wooden block. Finally, sand down any rough patches and paint to match your desk.
4. Simple Stool
No workshop is complete without a stool to prop yourself up against after a day on your feet. Why not improve your jigsaw skills by creating your own?
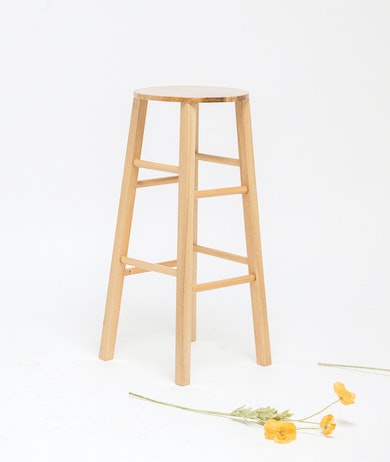
Build from either solid wood or plywood depending on what you have close to hand. A drill and a sander are useful as well but not required, plus some varnish to finish.
The classic circular stool is easier to build by using a jigsaw than a standard saw as you can simply cut out circles. A stool is one of our favorite jigsaw projects for beginners.
- Using a pencil attached to some string at the center draw your cutting circle.
- Clamp your material down onto a workbench and proceed to follow the pencil guideline.
- Clean up the edges to make rounded corners and stop and splinters.
- Next, we need to cut the legs. Cut four legs at your preferred seating height with the jigsaw.
- Cut four bracing bars that will fit in-between each leg to give it extra support.
- The legs can now be screwed to the top of the stool and the bracing bars screwed and glued into place.
With a final sand and a varnish you will be sitting comfortably in no time.
5. Toy Storage Box
If you are tired of your kids toys, or even your own tools, making the place look messy then making a simple storage box is a great little project.
Using either MDF or solid wood you can make many different designs and features. We like the idea of having your kid’s name on the front as an added extra. We think this storage box on Instructables is a great example for you to check out.

A storage box can be made to the exact size you need and out of any materials you have in your shop. We would recommend painting it to make it last longer and reduce the chance of splinters.
That wraps up our ultimate list of beginners’ jigsaw projects. We hope you had fun making these and learned a few important techniques along the way!
