
A floating bed frame is a great aesthetic to really enhance your bedroom, and they’re simpler than you might think. Compared to a standard 4-legged bed, it modernizes the room and looks a lot more unique. Just like a normal bed, it uses a bed frame, but it’s just suspended slightly differently.
Many floating beds found in stores are typically in the high end region in terms of price, so it can be quite off-putting to buy one. However, with a bit of DIY magic, you can build one for yourself using timber from most hardware stores. Whilst it can be an expensive job, building a floating bed frame will cost less in the long run.
This is our guide on how to build a floating bed frame, suitable for the beginner DIY’er. Building a bed frame will require a fair amount of wooden material, as well as appropriate screws. Don’t worry though-we’ve outlined what you’re going to need below.
What Do I Need To Build A Floating Bed Frame?
Building a floating bed frame is a three-step process. This means building a basic foundation (for the floating effect), building a mainframe, and finally building a slats frame. The list below shows you what you’re going to need:
- Basic drill (or a drill driver if you have screws that don’t require pre-drilling)
- Tape measure
- Pencil
- Table saw or circular saw (Hand saw if you want a challenge!)
- Wood glue
- Pocket hole jig
- Materials (available in each section below)
- Wood screws
Whilst you have a choice of lumber to use, most woods are suitable for this project. It really depends on what suits your room best, so have a think before you build. The budget option would be any hardwood plywood, but if you want to splash out, we suggest pine or walnut.
Pocket-hole Joinery
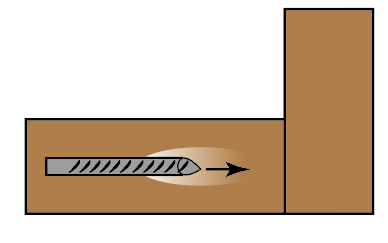
One thing worth noting is that due to the size of the materials, pocket hole joinery is wise. To attach the pieces together, make pocket holes to ensure strong bonds. This is easily done with a pocket jig, which can be easily bought at any hardware store for less than $20.
If you’re unfamiliar with this, a jig is easy to use and allows you to make pocket holes going horizontally into wood. Simply make a pocket hole with the appropriate drill bit and insert a screw into the material. This is shown below, and it really provides the strength required to support a bed frame.
Before starting, remember that in every joining step, wood glue should be used. It really helps with strengthening the wood, which is necessary for a bed build. Now you’ve got the basics, it’s time to build a floating bed frame. Let’s get started.
Step 1- The Floating Bed Foundation
Since a floating bed frame will have less balance than a traditional four-legged bed, it’s important that its strong, stable and secure. To do this, a central foundation is necessary to hold the bed together. This foundation will cover most the bed area yet remain invisible to the edges, creating the floating effect.
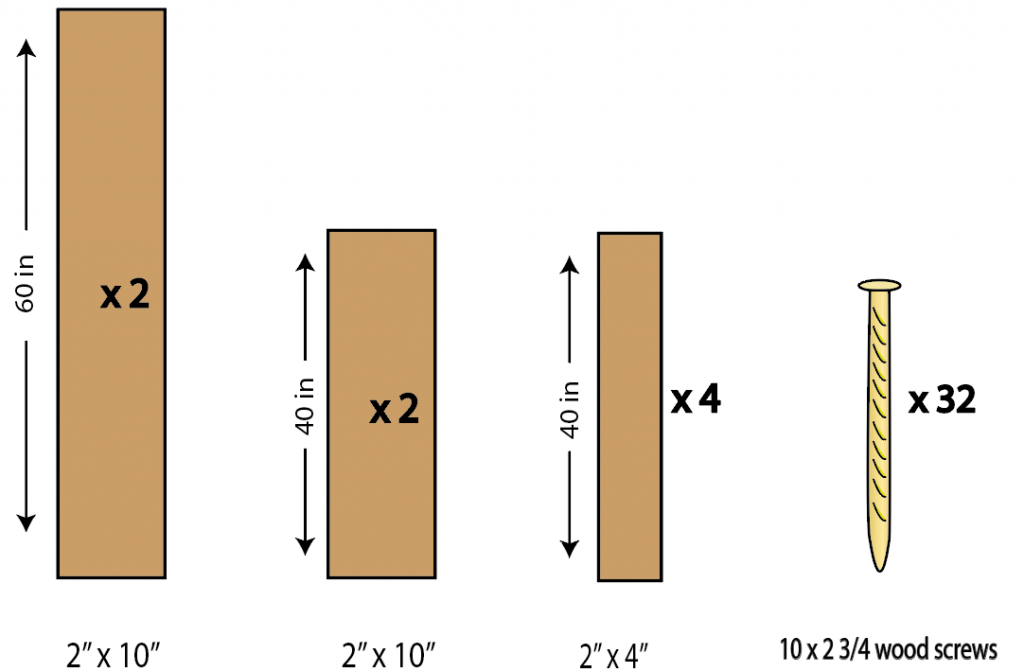
To do this, you will need the materials shown here:
Method
Safely cut the materials to the sizes shown, either with a table saw or circular saw. If you don’t have a thickness planer, make sure to buy pre-planed wood from the hardware store. The floating bed frame, particularly the foundation, needs to be flat and steady on surfaces.
Take a long piece of 2” x 10” and place it so the 2” face rests flat on the ground. Then, take the two short pieces and place them at a right angle, against the long piece, at both ends.
Place the other long piece at the opposite side and you should have a rectangular structure. Firstly, put some glue on each corner and firmly press pieces together. Then, by making pocket holes in the long pieces piercing the short pieces, secure with screws.
All pieces should have secured screws at the top and bottom of each corner. To ensure strength, use two screws at the top and two at the bottom, so each corner has 4. Using double the screws at both the top and bottom prevents any loose movement.
Finally, place the four pieces of 2” x 4” horizontally across the base of the foundation and secure. Again, use two screws per end, so each 2” x 4” has 4 screws. Flip it over, make sure its secure and you should have something similar to what’s shown below.
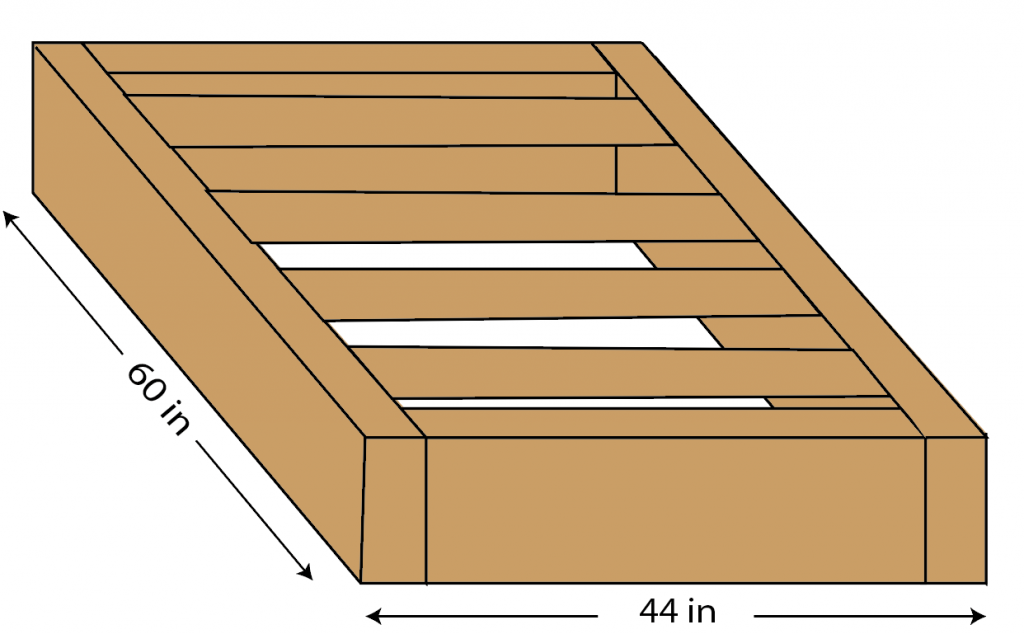
The basic foundation is complete and you’re ready to move on.
Step 2-The secondary frame
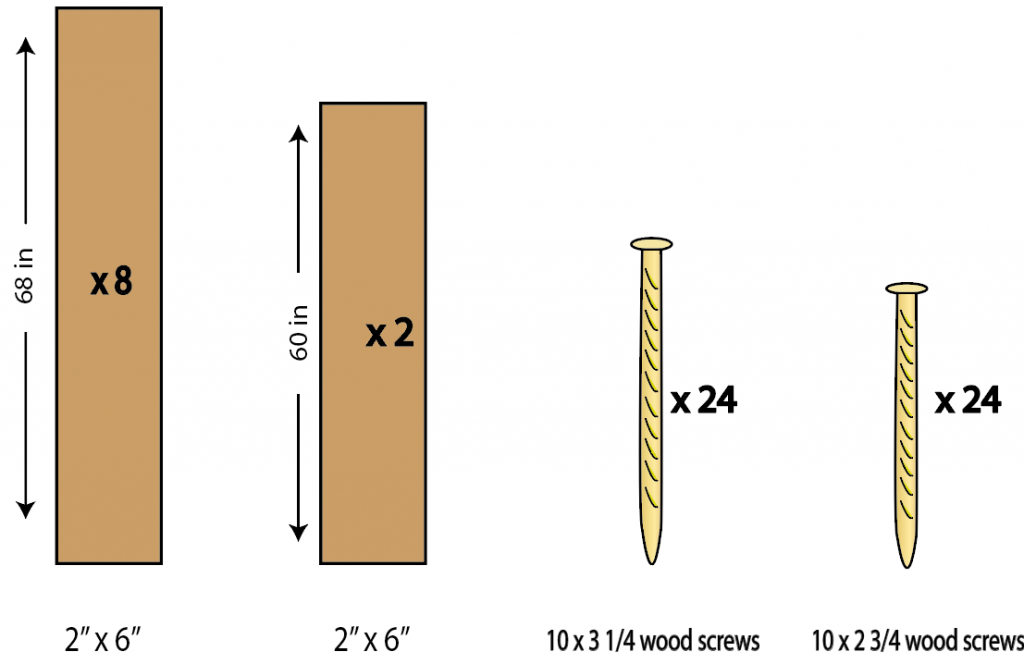
Now the basic foundation is done, you can get on with building the secondary frame. This involves six pieces of short 2” x 6” and two pieces of long 2” x 6”. The materials you will require are shown below.
Method
Begin by laying the six short boards flat on the ground parallel to each other. Leave 4 inches between each board with a space of 4 inches between them, amounting to 60 in total length. Then, move the second to outside pieces so that they are 2 inches from the outside pieces, instead of 4.
After this, take the two central panels and move them both inwards, so there is 2 inches between them. This realignment will make the structure more secure when attaching to the base. Once this is done, ensure the pieces are still parallel and not on an angle/rotated.
Once checking they are parallel, take the long 2” x 6” pieces and place them horizontally against the top and bottom ends of the short pieces. This will again create a rectangular shape, which is shown below. Once aligned properly, secure the structure with screws.
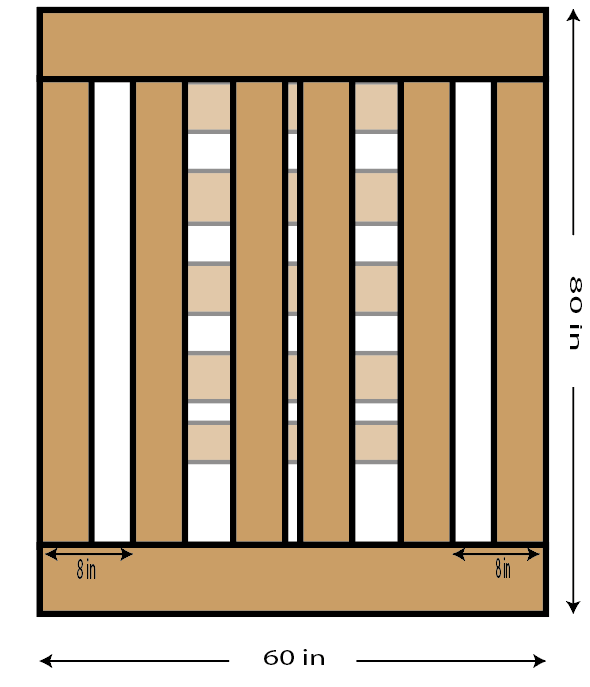
Similar to the foundation, each short piece should be secured at each end with two screws. Make pocket holes on the long pieces, facing inwards toward the short pieces. Do this on a flat surface, like the foundation, to make sure it is even.
Now comes the bit that requires extra focus-attaching the frame to the foundation. Take the frame and place it on top of the foundation, ensuring the top of both line up evenly. You will know when it is placed central as the frames middle panels line up with the edges of the foundation.
Secure the frame components together with the 10 x 2 ¾ screws via pocket holes. To secure the frame to the foundation, use the 10 x 3 ¼ screws which are slightly longer to ensure that extra strength. Once done, you have a basic floating bed frame.
Step 3-The slats
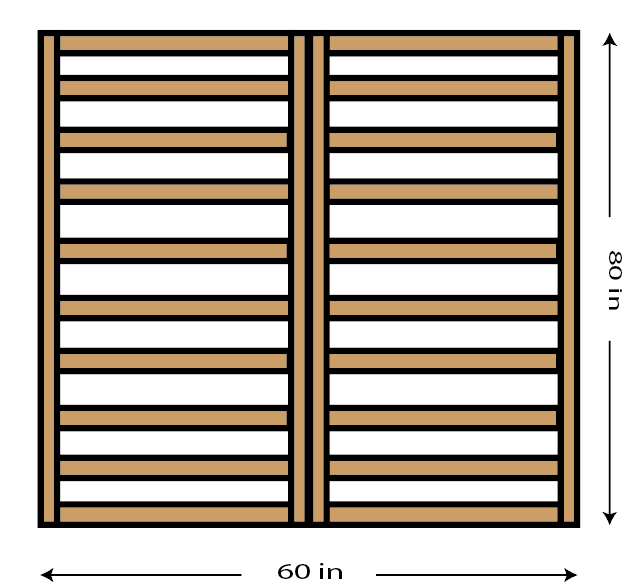
Now you have the floating bed frame, you need to make it suitable to sleep on. You can do this by attaching slats to the frame, completing the build and making it mattress ready. To do this, you’ll need the materials shown below.

Method
This is done using 2” x 4”, consisting of long and short pieces as shown above. As well as this, the screws used are similar to the frame build. This is so you can both build the slat frame and attach it to the main frame securely.
Take 10 short pieces and place them above one another so they are horizontally parallel, with 4 inches between each slat. Take the long pieces place them vertically at the ends of the slats. This should also follow the pattern of ending up with a rectangular shape.
Secure the slats to the long piece with the 10 x 2 ¾ screws. Again, use pocket holes and insert two screws going into each end of the slat. Repeat this with all 10 slats.
Repeat this to make another frame using the same method. Once done, place them on top of each other just to check if they are the same size. Now, its simply a case of securing the slat frames onto the main frame.
You’re slat frame will look like this.
Using the 10 x 3 ¼ wood screws, make 10 pilot holes along the length of each long piece of the slat frame. Ensure that each pilot hole is made in line with each slat piece to be joined. Once ready, place on top of the main frame and make marks for corresponding pilot holes.
Take the slat frame off and proceed to make pilot holes in the marked spots on the main frame. Place the slat frame back on and secure with screws. Congratulations-You now have a floating bed frame.
What next?
Well, you have your floating bed frame, but how to complete it? Place the frame in the appropriate area in your room. We suggest in the middle instead of a corner so you can fully see the floating effect.
If this is enough, simply get the mattress and the sheets on, but there is more you can do. Here are some examples:
- If you have extra wood, make a headboard-just make sure it lines up with the rest of the bed.
- If the wooden material you used doesn’t look the most aesthetic, make some sideboards. Do this with some stained wood or sanded material, then secure it onto the sides of the bed. Its an easy way to make the build more professional.
These are just a couple of ways, but there are plenty of enhancements you could make. All it requires is a bit of imagination and some extra material. Even without, you now have an attractive, secure floating bed frame.
Tips and tricks
- Self-tapping screws can make this job that bit quicker yet stay as secure.
- Build on a flat surface-this is crucial!
- To build a single floating bed instead of a double, reduce all sizes shown in these pictures by half. If you do this, you should be able to use one slat frame instead of two. Once secured, you should have a single floating bed.
- Spice it up! Check out our DIY IKEA hacks and see if any catch your eye. If you do, try add them to your floating bed!


2 comments
Hi Joshua, I was interested in making a floating bed and I came across your article. What size mattress is this floating bed frame for? A full size? Queen size?
Hi Daniel,
Glad you’re interested in making a floating bed! They’re a great addition to a bedroom and are better than standard beds in my personal opinion. This frame is designed to fit a king/queen-sized mattress (150cmx 200cm) but can be modified if you wish. For example, if you wanted to do a standard double bed, make sure the secondary frame is made to the size of a double bed (135cmx 190cm/54″x 95″) and make the floating foundation a bit larger to accommodate the weight distribution.
Hope this helps!