Like any piece of cutting equipment, over time chainsaw chains become dull. Some designs, like full chisel chains dull quicker than others. Cutting dirty wood or encountering nails whilst sawing can also dull your chainsaw chain.
Don’t worry though – chainsaw chains are designed to be sharpened and re-used! In this article, we’ll take a look at how to sharpen a chainsaw with the two most common types of sharpener – the file and the small electric sharpener.
How Chainsaw Chains Cut
Before we begin the sharpening process, it’s helpful to understand how a chainsaw chain works. This makes is much easier to understand what you are trying to achieve when you are sharpening the chain.
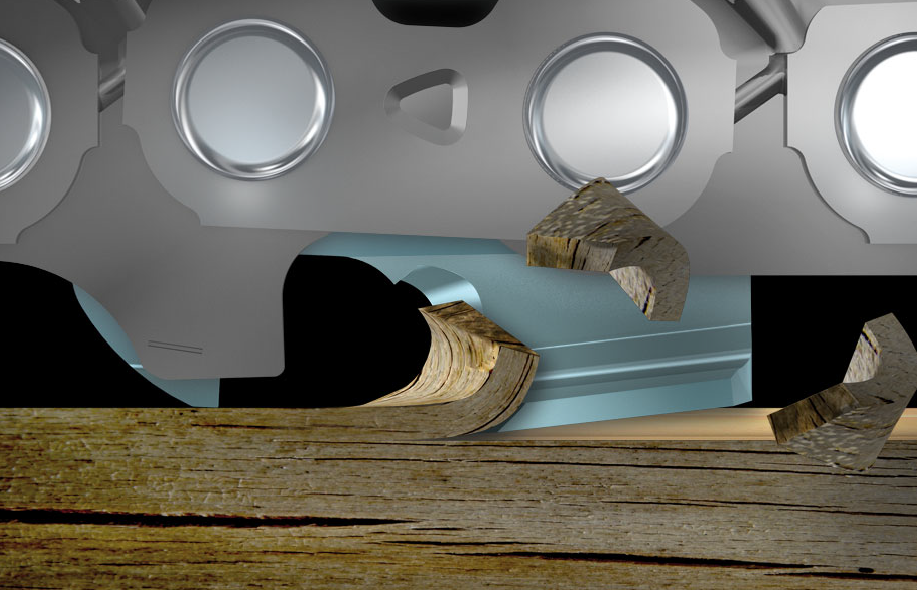
Chainsaw chains cut in a two step process, and overall it looks rather like a chisel shaving wood (it just happens much faster!). Firstly, a guide link runs along the wood surface. This sets the shaving depth for the cutting link which follows.
The top part of the cutting link (called the “top plate”), then slides along the wood after the guide link, shaving off a slice of wood. This is then repeated by the link behind and the one behind that as the chain moves. The diagram below helps to visualize it.
Sharpening The Chainsaw Chain
When you sharpen your chainsaw chain, you do so it two steps. First, you remove material from the cutting link, in order to sharpen the cutting edge. The second step is to examine the height of the cutting link compared to the guide link to establish the correct cutting depth. If you only removed material from the cutting link, eventually it would be much lower than the guide link, and would not touch the wood and cut as the chain rotated.
Sharpening the Cutting Links
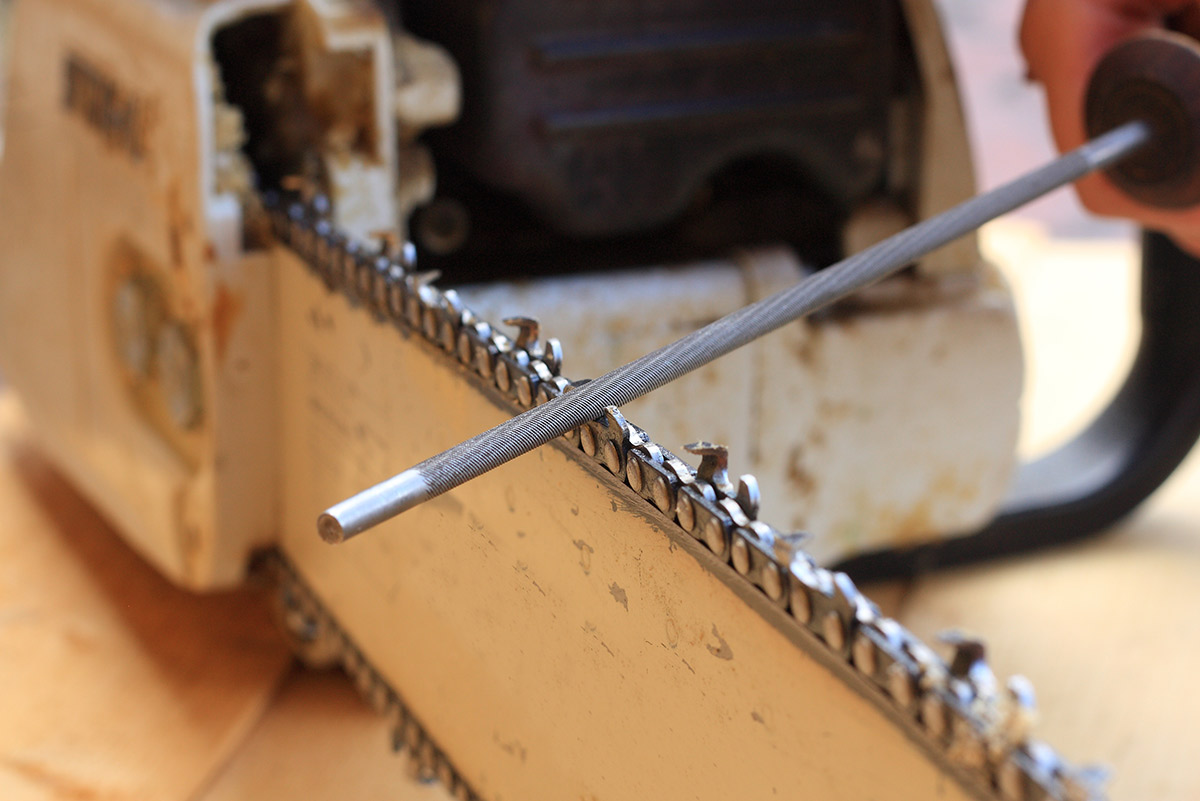
In this discussion, we’ll only look at round ground chainsaw chains. Very few people use straight ground, and we’ll assume you know what you are doing if you are using one! The first thing to check is the size of your round ground – this will be written on the chain packet. If it isn’t, this corresponds to the size of the cylindrical rat-tail file you slide into the cutting link. Test a few, and find the correct size.
Next, determine the sharpening angle. Again, this should be noted on the chain packaging or on the saw. Most are 30 degrees, but it’s worth checking. Once you have chosen the correct size file, mount it in the guide. For electric sharpeners, mount the correct diameter sharpening stone in the machine.
Holding the grinder across the chainsaw bar, with the file or cutting stone in a cutting link, get the angle correct by aligning the angle guide on the chainsaw bar. For an electric grinder, you can now turn the grinder on and press it gently into the link. 1-2 seconds should be enough. For a file, push it forward toward the tip of the saw three times.
Remember there are left and right links. Work your way around the saw sharpening all or one side then all of the other. Many people like to mark the link they started on to make sure they don’t lose their place. This process is identical for electric chainsaws.
Filing the Guide Links
So, you’ve removed material from the cutting link, now it’s time to check the cutting depth. Again, there is a handy tool for this, which you place across the top of the cutting link, and let the depth link stick through the hole.
Run your finger across the guide, and if you can feel the link popping out of the hole, then file it down flush. The diagram below explains it well.

Now your chain is sharp and ready for cutting!
How Many Times Can You Sharpen Your Chainsaw Chain?
Obviously, if you are removing material from your chainsaw chain, there must be a point at which you can no longer remove any more material. That is correct, but many people are unsure when a chainsaw chain is worn out. In fact, you can get quite a bit of use out of a chainsaw chain.
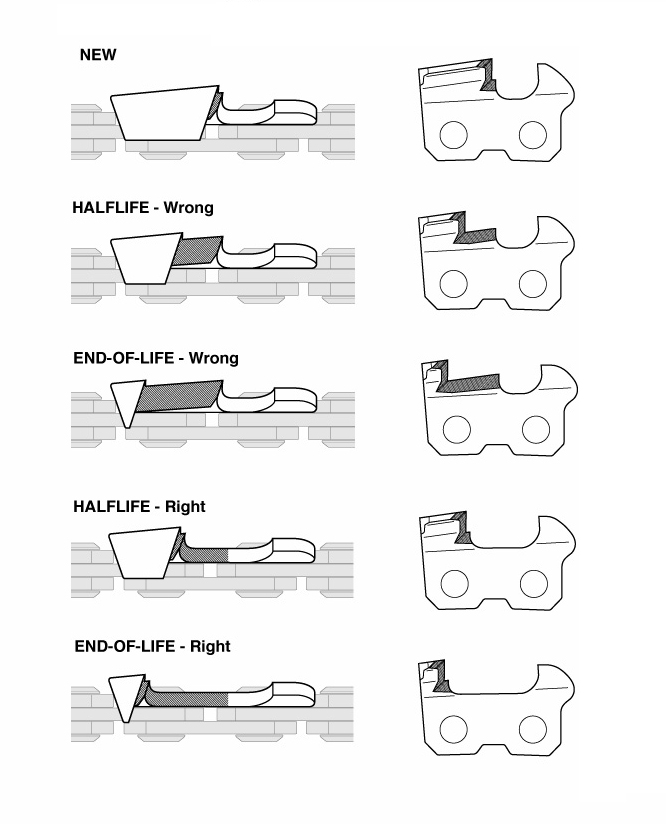
Essentially the chain cannot be sharpened anymore and should be replaced when there isn’t enough material left on the cutting link. You can see in the diagram below a half-worn chain on the image marked “Half Life Right”. When full worn, it will look like “End of Life Right”.
Rotate Your Chains!
You should aim to have two to three chains on rotation at any one time. Use one for a few sessions, then swap it out for another. Why? Well, the chain, sprocket, and to some extent the bar wear together rather like a bike chain. If one combination wears together too much, you won’t be able to simply replace the chain, you have to replace the sprocket too.
The best way to avoid this is to rotate through 3 chains at a time, and thus prevent the sprocket from wearing into any one chain.


1 comment
This post is really helpful. Thank you so much!