When it comes to growing herbs and spices, it can already be technical enough without wondering where to plant them! There’s plenty of different aspects to herb gardening and it can be quite the task for beginners. However, if you’ve read our guide on planting a herb garden bed, you’ll know it’s quite possible for anyone to do.
With that in mind, you can bring your DIY skills into herb gardening quite easily too. With some basic woodworking skills and the right materials, you can easily build your own herb and spices planter box. It isn’t a complicated job and it’s a great way to get started with DIY and woodworking especially for gardeners!
By building your own herb planter, you save money and ground space for your herb garden. It also means you have a separate, designated spot for your herbs, so it makes it feel that bit more special. As well as this, it simply makes a great addition to any garden, and it can be quite the talking point!
What You Need To Build Your Herb Planter
It’s not too difficult to build your own herb planter as you’re about to see, but you will need a few bits of things. You’ll need:
- Miter saw
- Jigsaw
- Drill/driver
- Orbital sander or detail sander with 160+ grit sandpaper
- Woodscrews – boxes of 2”, 1” and 1 ½“
- Wood glue and wood filler
- Standard 2” x 1” CLS timber (enough for 10m total length)
- 1” plywood sheet
- ¾” plywood sheet
- Waterproof wood stain/wood wax
- Flatwood and countersink drill bit
…and don’t forget a tape measure!
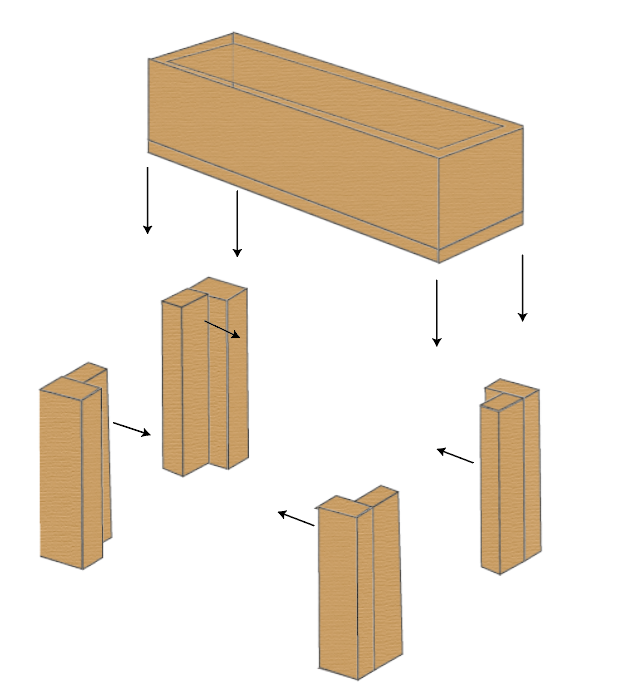
Making The Legs
First things first, your planter is going to be standing, so it needs legs! In total, there will be eight legs (two on each corner) to provide enough strength for the box. These legs will be made from the 2” x 1” CLS timber due to its cost-efficient nature.
Use the miter saw to cut down the 2”x 1” into eight pieces, all of which measure 1000mm (100cm) in length. This may seem high, but since you’re going to be stood up, your herb planter can’t be too low down. Sand the pieces down, both their surfaces and their ends, with fine sandpaper (200 grit+) to prevent material removal.
Once done, place two pieces at a right angle to each other as shown below. Use wood glue to hold the pieces together before making four pilot holes as seen below. Countersink the holes and secure the pieces together with 2” woodscrews.
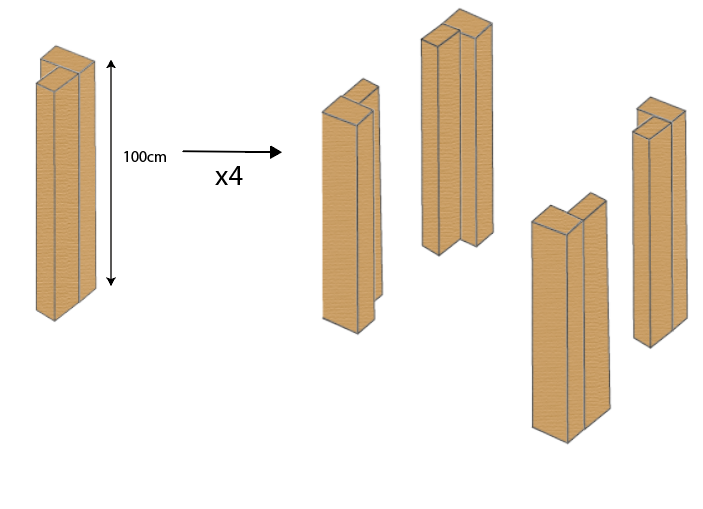
Repeat this in the same way for the other pieces, which should leave four legs in total. Ensure all pieces are the same height and sand them down together if not before staining. Use wood filler to cover up the hole marks.
Building The Planter Frame
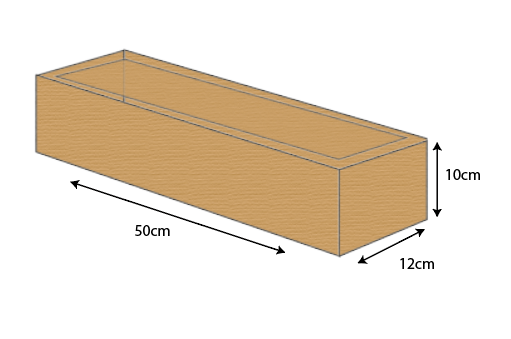
This is the main rectangular structure for your planter, and it’s going to be made from ¾” plywood. This is a simple step, but since it’s going to be your planting area, its dimensions need to be spot on. The sizes we use are for a planting area big enough to grow 4-5 small herb plants.
Use a jigsaw (or sliding miter saw if you have one) to cut two pieces of ¾” measuring 12”x 10”. Sand these pieces down and stain appropriately. These will be your side pieces.
Next, use the jigsaw/sliding miter saw again to cut two more pieces measuring 10”x 50” each. Again, sand these pieces down with fine sandpaper and stain appropriately. For all four pieces, apply waterproof wax once sanded.
Make four pilot holes in the ends of each long piece going into the sides as shown below. Use wood glue to hold the pieces in a rectangular shape as seen below and secure with 1½” woodscrews. These holes should be equidistant to each other for maximum structural strength.
Building The Planter Base
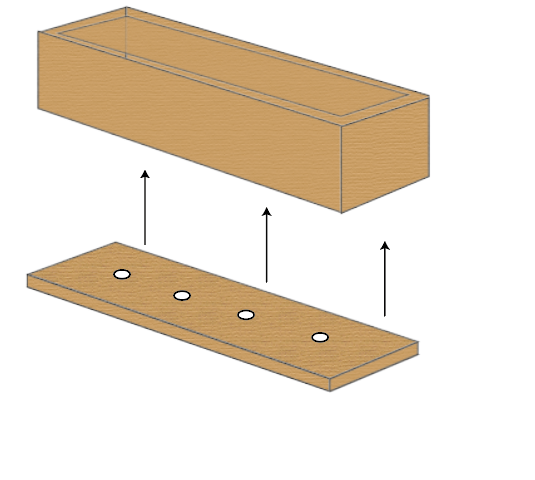
This might seem like a simple bit of cutting, but again, it needs to be cut accurately to fit properly and work. The base of your planter box will be made from a 1” thick plywood sheet. This provides more strength to hold the weight of the soil without being too heavy itself.
Cut a single piece of 1” plywood board that measures 12”x 50” and sand with fine sandpaper. Using a ruler, make a horizontal line across the middle of the piece. Along this line, use a flatwood drill bit to make four equidistant drainage holes, sand once more and then apply wax.
Secure this base onto the planter frame by holding with wood glue, pre-drilling pilot holes and securing with 1½” woodscrews. Once done, attach this unit onto the top of the four legs as shown below. Ensure the top of the planter unit and the top of the legs line up.
Building The Top Panels
You now have your herb box on legs, but to make it look professional, it needs some top panels. Four top panels, all with miter cuts on each end, will be made from ¾” plywood and attached. This enhances the planter’s aesthetics whilst also covering up the cuts.

Use a jigsaw to cut four pieces of ¾ that measure 12” in length and 3” in width, both with mitre cuts on the end. Sand down these two pieces and stain with waterproof wax. Repeat this but cut two pieces of ¾” that measure 50” in length and 3” in width.
Now you have top panels, secure them onto the planter as shown below, ensuring the mitre joints line up smoothly. Ensure that the outer sides of each panel also line up with the legs. Whilst this isn’t necessary, it makes your project look a lot cleaner.
Finishing Touches
Now you have your herb planter, it’s time to get on with the finishing touches. Since you should have been staining your pieces with every step, the second layer of stain always helps with weather protection. Double-check the legs are all even and that nothing is wonky too: this doesn’t look good!
If you want to add a bit more to your planter, you have a couple of options. Firstly, make a bottom layer to your planter by cutting a piece of ¾” to fit in between the legs. This is a great place to store some small tools and actually strengthens the unit a bit too!
Secondly, separate your herb plants by cutting some ½” pieces that fit inside the planter box. This won’t require much material and is a flush way to compartmentalize your herb planter.
Conclusion
Overall, your herb planter is great as it is, and it really isn’t a difficult build either. As we said, it’s perfect for the gardener who happens to be a novice in DIY, and it doesn’t cost much either! All it needs is a trip to the hardware store to buy your CLS and plywood sheets…just don’t forget your woodscrews!