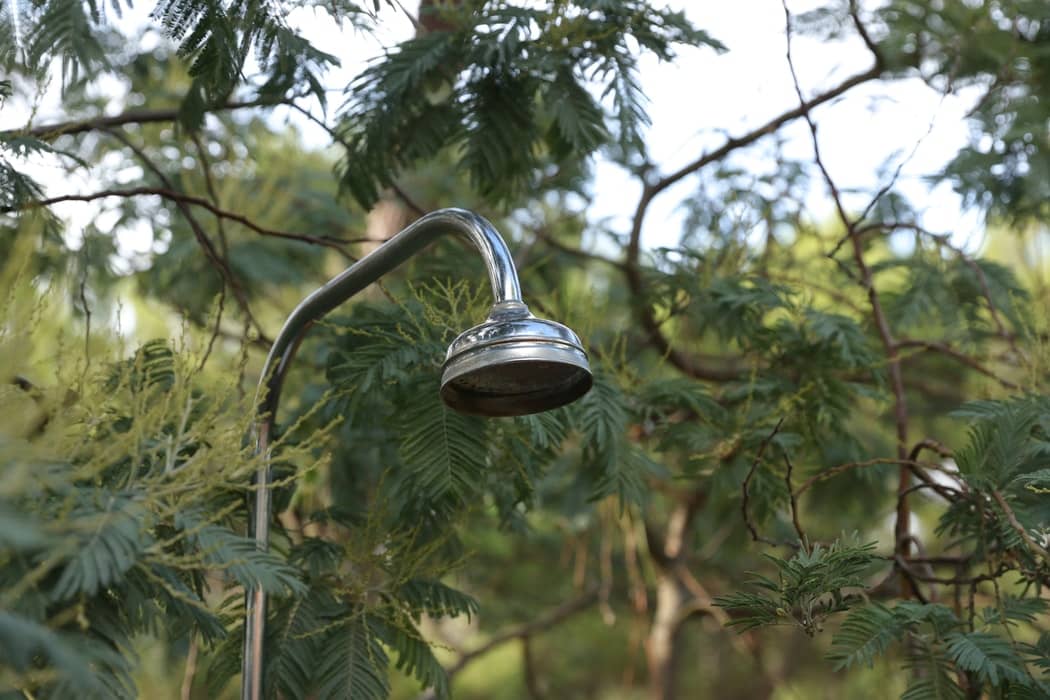
Outdoor showers are commonly found on campsites or beaches, but they’re also a great feature for your backyard. They’re particularly useful to your home if you have an outdoor pool, or even if you work outdoors. Either way, an outdoor shower enclosure is a great aesthetic to the side of your home.
Whilst the plumbing side of things is a separate job, the enclosure can easily be done with some DIY magic. You don’t have to use expensive materials either, as timber commonly sold at hardware stores will get this done. By just using timber, you can build a great-looking outdoor shower enclosure to show off to the neighbors.
What Materials Do You Need?
To start building, look no further than Workshopedia’s outdoor shower enclosure build. These plans are our own take on how to build an outdoor shower enclosure, using suitable yet common materials. To get this project done, all you will need are the materials below:
- Circular saw or table saw
- Water-resistant wood glue
- Drill/driver
- Timber materials (see below)
- Pocket jig
- Zinc-plated wood screws (sizes below)
- Orbital sander
- Waterproof stain
- Cloth or spare rag
- Pencil, tape measure, and ruler
- Hinge and lock of your choice
- Clothes hook (optional)
- Miter saw (optional)
This is a budget method for this project, but feel free to pick more expensive timber if you wish. Whatever choice you make, just make sure you get the appropriate waterproof stain for your wood. For this particular project, getting the right waterproof stain is of huge importance, otherwise, it will look tired over time.
How To Start Building Your Outdoor Shower Enclosure
For this project, we begin with the square enclosure base to get the shape of the project. After this, we’ll go through the side frames, before moving onto the door. After that, some optional extras will be included to help spice up your project.
Once you’ve got the materials and you’re ready to go, you can get started. Here’s how to build an outdoor shower enclosure.
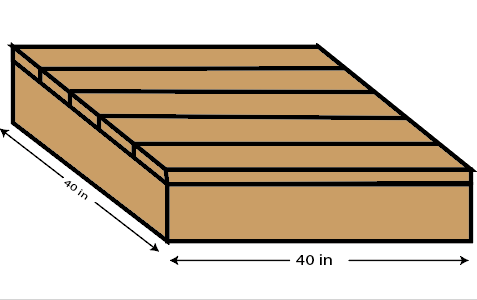
Step 1 – Shower Base
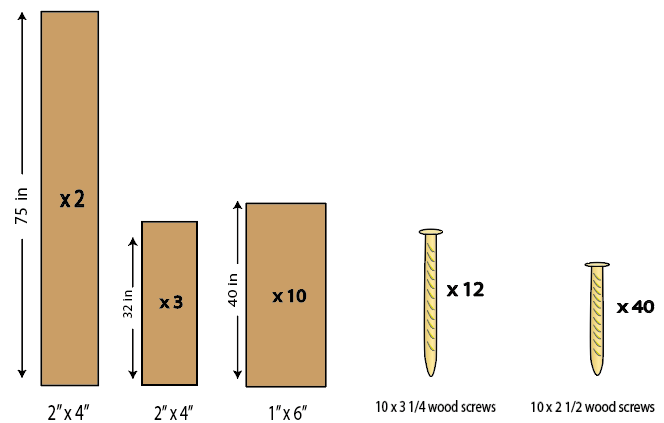
Despite being the simplest step, making a secure base is important for this project. It needs to be flat and even because it will suspend the entire enclosure. To do this, you will need what’s shown below:
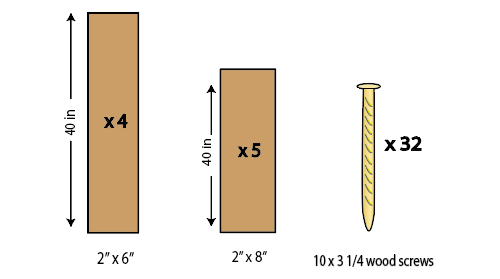
Method Part 1
Begin by taking the four pieces of 2” x 6” and create a square shape, making sure each end lines up. If you have a large clamp, this is a great time to use it. If not, don’t worry, just lie them on a flat surface and align them properly.
Take your pocket jig and set it up ready to drill a pocket hole. Drill the pocket hole in line with the piece to be attached. If you need a refresher on pocket hole joinery, check out our floating bed frame build.
On each corner, make 3 pocket holes along the face of the wood. By using 3 instead of two at the top and bottom, you have that extra bit of security. Remember, you’re going to be standing on it, so strength is key.
Method Part 2
After the holes are drilled, evenly spread the wood glue and piece them together. Insert the 10 x 3 ¼ wood screws in with a drill or driver into the holes, making sure they line up. Repeat this with the other corners.
Now done, take the 2” x 8” panels and line them up on top of the square base, leaving no gaps. Make two pilot holes on each end of the panel going into the base, before applying glue. Proceed to secure with more 10 x 3 ¼ screws.
You should now have the base done-and it should look something like this.
Step 2 – Outdoor Shower Enclosure Side Frames
This will be the main part of the project, but it doesn’t have to take a long time. However, as you will have to repeat this step 3 times, it’s important that you get it right. To do all three side frames the materials are below.
Method Part 1
To start, take the two long pieces of 2” x 4” and line them vertically on a flat surface. Move them apart from each other so the two short pieces of 2” x 4” fit between horizontally. With these 4 pieces, make a rectangular structure.
Once done, move one of the short pieces to the middle of the frame, so you now have a top and middle horizontal panel. Using the same method as used in the base, make pocket holes and glue to secure the frame. Proceed to secure with 10 x 3¼ screws.
Place another short 2” x 4” panel in between the pre-secured short panels. As it’s the same size as the top and bottom 2” x 4” panels, it should fit perfectly in the structure. By this point, you should have two long pieces held by 3 horizontal pieces.
Method Part 2
Now lay the structure flat and take your 1” x 4” pieces. One by one, lay them flat on top of the structure, stacking them up until you reach the end. However, don’t place the last two-this will be a gap at the bottom of the enclosure for drainage.
When lined up, make two pilot holes on each panel end before gluing each panel to the structure. Take your 10 x 2 ½ wood screws and secure each panel to the main structure.
This should leave no gaps and line up perfectly with the main structure. Now you’re done, you should have a side looking like this.
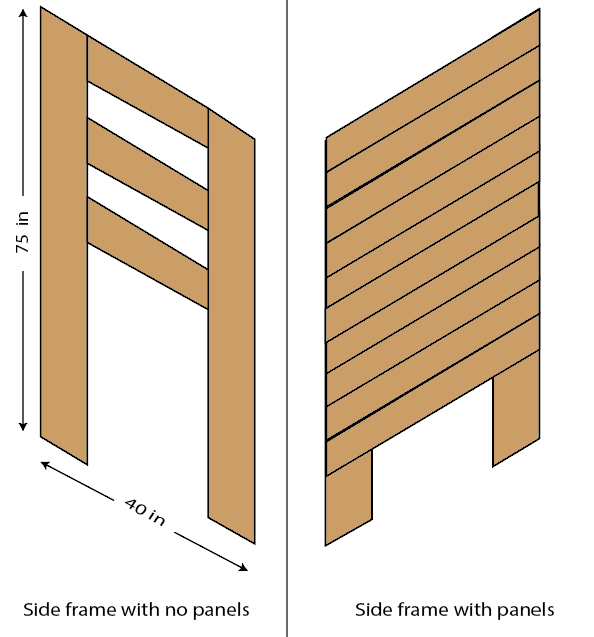
Repeat this 3 times and you now have the sides for the outdoor shower enclosure.
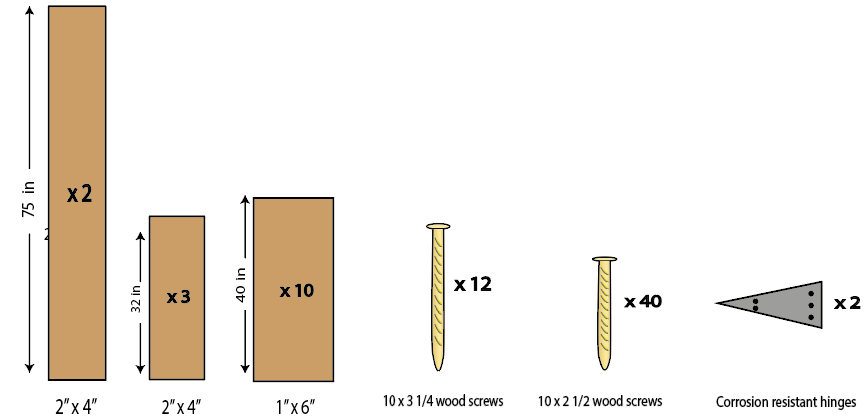
Step 3 – Shower Door
Whilst this is similar to simply building another side frame to the enclosure, there are a couple of differences. The materials needed are shown below.
Method Part 1
Repeat the method above and build another side frame structure. However, Once you’re done with this, cut the loose ends of the long 2” x 4” pieces. These are the ends which no panels cover, leaving a rectangular door.
Since this is a door, it needs some hinges. Take two of your hinges of choice, ideally ones that are 6 inches or more. Secure them onto the top of the door frame, ensuring they are parallel with each other.
Now you have your three side frames and your door, it’s time to put them together. Place the edge of the door against the edge of a side frame, making a right angle. Secure the ends of each hinge onto the side frame edge, using any screws less than 2 inches in length.
After this is done, flip the structure so the side frame lies flat. Take another side frame and place it at a right angle to the structure, ensuring it stands straight. Attach it securely using the pocket hole method.
Method Part 2
To complete the structure lay the last side frame on top, lining it up properly. Secure with screws and you should have a completed, four wall outdoor shower enclosure. Stand it upright and check if it stands.
Now upright, take your lock and place it in the appropriate position on the door and respective side frame. Secure with screws in the position that suits you best. One thing-make sure it locks from the inside!
To finish off, sand down the base. Whilst you are welcome to sand the whole piece, it isn’t entirely necessary. The base is most important as you don’t want to stand on rough wood!
Finishing Touches
Now you have the enclosure built, there are just a couple more things you need to do.
Firstly, take your waterproof stain and take your spare cloth, dipping it gently in the stain. Apply evenly across the structure and rub it in a circular motion. Make sure to not use too much stain on one area, as this will make it uneven.
This may take some time, but it’s important to make the wood waterproof. Leave it to dry overnight, and applying a second cover will benefit you in the long run. Before you do this, test some stains on spare wood to see what color suits you best.
Finally, place the main structure over the base. Secure the legs into the base using 10 x 3¼ screws. Glue is recommended for extra strength.
Tips And Tricks
Once done, your outdoor shower enclosure is done. However, you can add a few enhancements to spice it up a little. Decorate it however you want, but just make sure you use waterproof materials when you do.
Adding To Your Outdoor Shower Enclosure
- Shower seat – if you have some spare wood, make a rectangular seat and sand it down. Make a triangular piece to act as a bracket and secure it to the side frames inside the enclosure. Stain it to make it waterproof and boom, you have a seat!
- If you have a spare hook, secure it onto the outside of the shower. This could be a towel or clothes hook and makes showering outdoor that bit handier.
- Roof – take your miter saw and cut 4 pieces of 2” x 4” if you have them spare. Make sure on each end you make a miter cut and ensure they are all the same size. Place on top of the enclosure and connect them together.
- Make it unique! Check out our post on getting a burnt wood effect for a great look.
These are just some ideas, but you can spice up your outdoor shower enclosure to make it look good. These plans are a basic outline for both beginner and expert DIYer, without being too expensive. Either way, you can now stay clean outdoors with ease!